Tip of the Month - April 2020 - Virtual Modelling on an iPad
Mirroring your iPad screen
There are a number of different ways (and software) which you can use to mirror your iPad in order to do virtual modelling on an iPad with an AAC system or for supporting teams with training.
ZOOM
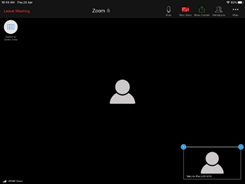
Download the Zoom app on your iPad and either download the Zoom app or join from the web on both your computer. Join the meeting from your computer to project a video of yourself and then join the meeting from your iPad in order
to share your screen. On your iPad, click on Share content and then click on Screen
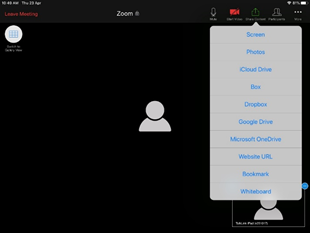
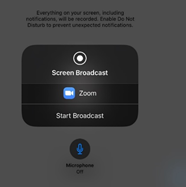
and then click on Start Broadcast
Now you can go to another app and start modelling on your AAC app.
Microsoft Teams
Download the Teams app onto your iPad and sign in with your account. Join the meeting on your Teams software on your computer to project a video of yourself and then join the meeting from your iPad in order to share your screen. Once you have joined the meeting on your iPad, click on the three little dots

Then click Share
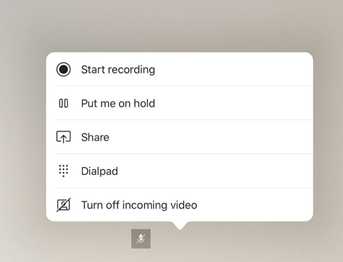
and then click on Share screen

and then click on Start Broadcast
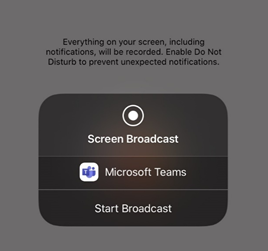
Now you can go to another app and start modelling on your AAC app.
Other software
There is software which can screen mirror to a computer directly, however most of these have a cost, e.g. Mirroring360, AirServer, LoneyScreen, Mac Plug-in Hack, ApowerMirror, Reflector.
Setting up Assistive Touch so others can see where you are pointing on the screen
Next you will need to change the settings so that it shows a dot where you are selecting (like a mouse cursor) so that others can see what you are pointing to on the iPad screen. Here are the instructions below with a screen recording of how to set it up – go here https://tinyurl.com/touchsettings, download the file and then open it to watch. Alternatively, you can watch this YouTube video: https://www.youtube.com/watch?v=DAXxgBo-Mr4
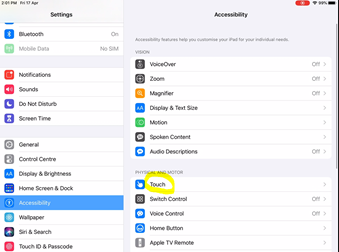
Go into Settings app on the iPad. Click on Accessibility and then Touch
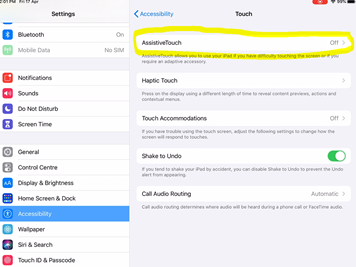
Click on Assistive Touch and toggle Assistive Touch ON
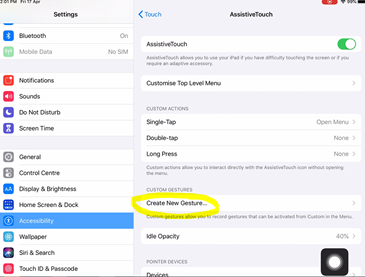
Go down to Create New Gesture
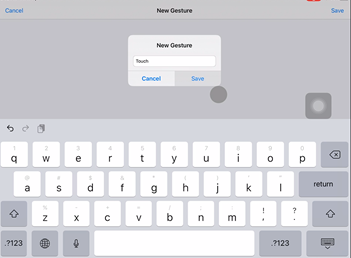
tap on the screen once and a blue dot should appear
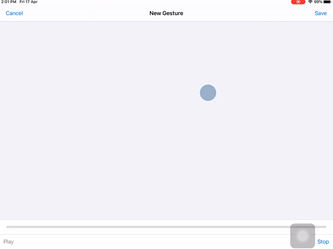
select Save and name it, e.g. Touch
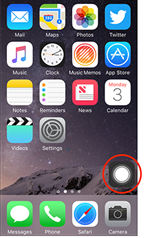
Then go into your AAC app and open up the assistive touch panel (white dot on the screen)
and select Custom (star)
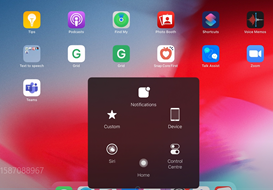
then select Touch (also a star)
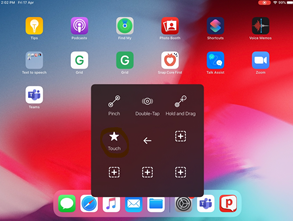
Now you should see a dot appear on the screen for where you select
Note: you may have to repeat this step as it will disappear when you idle
Recording a video to send later (not live streaming)
You can create a meeting and just invite yourself using your preferred platform, e.g. Zoom, Teams. Then join the meeting as per one of the above and click on ‘start recording’.
Zoom: decide whether to Record to the Cloud or your own computer (Record on this Computer).

Teams: If you forget to stop the recording before you end the meeting, it will auto-save but you’ll need to wait a while before it comes through on your email or in the Chat window of the meeting

Then you can either upload the recording to your file sharing system (e.g. Google Drive or OneDrive) or share it straight from the cloud using ‘get sharable link’.
To download this Tip of the Month as a PDF, please click here
Mirroring your iPad screen
There are a number of different ways (and software) which you can use to mirror your iPad in order to do virtual modelling on an iPad with an AAC system or for supporting teams with training.
ZOOM
Download the Zoom app on your iPad and either download the Zoom app or join from the web on both your computer. Join the meeting from your computer to project a video of yourself and then join the meeting from your iPad in order
to share your screen. On your iPad, click on Share content and then click on Screen
and then click on Start Broadcast
Now you can go to another app and start modelling on your AAC app.
Microsoft Teams
Download the Teams app onto your iPad and sign in with your account. Join the meeting on your Teams software on your computer to project a video of yourself and then join the meeting from your iPad in order to share your screen. Once you have joined the meeting on your iPad, click on the three little dots
Then click Share
and then click on Share screen
and then click on Start Broadcast
Now you can go to another app and start modelling on your AAC app.
Other software
There is software which can screen mirror to a computer directly, however most of these have a cost, e.g. Mirroring360, AirServer, LoneyScreen, Mac Plug-in Hack, ApowerMirror, Reflector.
Setting up Assistive Touch so others can see where you are pointing on the screen
Next you will need to change the settings so that it shows a dot where you are selecting (like a mouse cursor) so that others can see what you are pointing to on the iPad screen. Here are the instructions below with a screen recording of how to set it up – go here https://tinyurl.com/touchsettings, download the file and then open it to watch. Alternatively, you can watch this YouTube video: https://www.youtube.com/watch?v=DAXxgBo-Mr4
Go into Settings app on the iPad. Click on Accessibility and then Touch
Click on Assistive Touch and toggle Assistive Touch ON
Go down to Create New Gesture
tap on the screen once and a blue dot should appear
select Save and name it, e.g. Touch
Then go into your AAC app and open up the assistive touch panel (white dot on the screen)
and select Custom (star)
then select Touch (also a star)
Now you should see a dot appear on the screen for where you select
Note: you may have to repeat this step as it will disappear when you idle
Recording a video to send later (not live streaming)
You can create a meeting and just invite yourself using your preferred platform, e.g. Zoom, Teams. Then join the meeting as per one of the above and click on ‘start recording’.
Zoom: decide whether to Record to the Cloud or your own computer (Record on this Computer).
Teams: If you forget to stop the recording before you end the meeting, it will auto-save but you’ll need to wait a while before it comes through on your email or in the Chat window of the meeting
Then you can either upload the recording to your file sharing system (e.g. Google Drive or OneDrive) or share it straight from the cloud using ‘get sharable link’.
To download this Tip of the Month as a PDF, please click here