Tip of the Month November - Eye Gaze Activity Boards to Develop Emergent Eye Gaze Skills
What is an eye gaze activity board and who can use it?
Eye gaze activity boards are a great starting point for someone who is just starting to learn to use their eyes to communicate. Eye gaze is an access method for those who cannot directly select words or phrases on a communication system using their hands or fingers to point. Options are presented visually on the board and the individual uses their eyes to look at one of those options to select it.
Using an eye gaze activity board is limiting as there are only a few words available based on a particular activity, e.g. playdough. However, using activity boards is a great starting point for developing eye gaze as an access method, so the individual can use a more robust communication book or high tech device in the future.
How to create a portable eye gaze board
- Choose the vocabulary for each activity board (see ideas below). You don’t need to start with 6 or 8 options of words, you could just start with 3 words spaced out around the board, so that it is easier to see what the individual is looking at.
- Print out the words with a symbol or photo.
- Laminate the words. Use extra thick laminating pouches (250 microns) to create these boards, rather than using a bulky and heavy Perspex E-tran frame if you’d like to create something portable and lightweight.
- Cut out a rectangular hole in the middle so that you can look through it.
- Label the symbol on the reverse to help the communication partner.

How to use an eye gaze board
- 1.Establish a consistent ‘script’ for prompting eye gaze: Look around, look at me, look to choose
Sometimes it is difficult to know when someone is looking around to see what the options are, verses looking at a word to select it. Having a consistent script that everyone uses can help everyone to have clarity about looking to see what the options are verses looking to select.
“Look around” - expect that the individual will look at all the options on the board. This might only take a few seconds if they have been using this board for a while or it might take a while if it is new. It is important to give them lots of time.
“Look at me” – by looking at their communication partner, the individual is showing you that they have found the word that they want to communicate and are ready to tell you
“Look to choose” – the individual should look directly at the word they want to communicate and then you can acknowledge them through repeating the word “Oh you are telling me XYZ” and then doing what they have communicated.
Here is an example of an eye gaze board being used: https://www.youtube.com/watch?v=EqH6CdBleic
It is important for the whole team to present the options on the board in a consistent way, e.g. you might point to and name each the options in a clockwise manner starting at the top left corner each time.
Here is an example script: Laminate and attach this script to each of the eye gaze boards.
Adults...please all follow this script when presenting choices to Lucy so we all present them in the same way:
“Lucy it’s time to choose. You can use your eyes to tell me what you want”
“Let’s look at the options first together” (go through each option available with Lucy starting top right and going clockwise)
“Ready to choose...remember look at me to tell me you are ready to choose and then look at the one you want”
2. Give feedback
When you start teaching someone to use their eyes to communicate, it might be confusing for everyone. It is helpful for the communication partner to give lots of feedback about what you are noticing, e.g. “I see you quickly looked at ‘red’ so I think you want to wear your red top today” even if they only looked very briefly at the word/symbol red and then went on gazing out the window OR the individual might be looking quickly at all the options and never really gazing for long at any of them “You keep looking all around the board and I am not sure which word you want to choose today. Remember, look around to see all the options, look at me when you are ready, look to choose one word”. Giving feedback will teach the individual what you are noticing about their eye gaze and start to shape it into a more clear access method.
3. Be consistent!
Whatever script you decide to use or way of presenting the options, make sure that everyone on the team is consistent. It is confusing if some team members expect the individual to look at the communication partner before selecting the word and other team members to just expect a long gaze at a word to select it. This will help the individual to learn the system and to anticipate the word or phrase they want to select. Make sure you write clear instructions on the back of the boards if it is going to be used by multiple communication partners to ensure that everyone is using it in the same way.
4. Tips
Keep the board where you would normally use it, e.g. keep a farm animal board by your gumboots at the back door, so that it is ready to be used when you are going out for your walk or a colours board in the art box or a mealtime board on the fridge/pantry.
Remember to ensure that you are on the same level as the individual’s eyes when using the eye gaze board – this might mean squatting or sitting down so that you are not leaning or standing over the individual.
Also start working on using eye gaze to select ‘yes’ and ‘no’ to make choices. See this tip of the month for more info on teaching yes/no. http://talklink.org.nz/resources/tip-of-the-month-september-2017-teaching-yes-and-no-to-confirm-or-reject
Clear your brain of any possible messages before you start using the board so that you don’t accidentally prompt the individual to look at a certain word that you want. Just wait expectantly with your eyes on theirs until they are ready to make a selection.

How to model language on an eye gaze board
As with all AAC systems, the individual will need their system to be modelled to them throughout their day and with multiple communication partners. Remember, your communication partner will learn the system through continuous exposure to it. To model on an eye gaze board, you can either use your finger to point to a word or you can use your eyes like the individual would. Remember to give feedback and explain what you are looking at make a selection.

Examples of eye gaze boards
If you live on a farm and go for a walk to visit all the animals each day, you could use this board to ask the individual what order to visit the animals in.
This is not so much about naming the animal that you see, but about making a real life choice about which animal to visit next.  | Starting to introduce some core vocabulary words to be used in a range of activities, e.g. ‘go’ to make the music play, to make a toy car go down a ramp, to start a race, etc. |
Make choices about which pet to have a cuddle with or which order to give them their food in or which order to give them a bath in.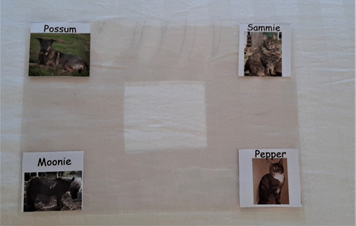 | Make choices and some comments during specific activities, such as bubbles, building with blocks, playing with trains, playing hide and seek, Mr Potato Head, etc.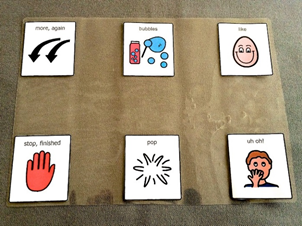 |
Make choices about which song you’d like to sing. | Make choices about what to do during doll play.  |
You can choose what song you would like to sing. | Make choices about colours during an art activity. Or make choices about what clothes to wear, e.g. put a green and a red top out in the morning and ask which top they’d like to wear. |
Make choices about what to do during break times.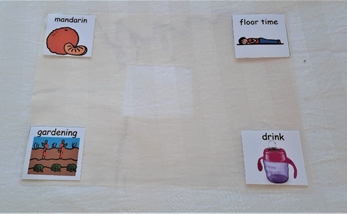 | Make choices about what to do during free time.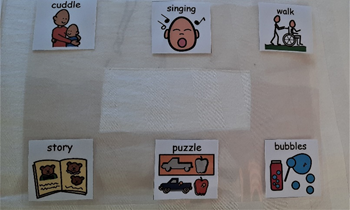 |
Image references: https://aacbooks.net/books/AdaptingLowTech/
Created by Jessamy Bell (SLT) and Polly Thomas (Specialist Teacher) May 2020
To download this Tip of the Month as a PDF, please click here
What is an eye gaze activity board and who can use it?
Eye gaze activity boards are a great starting point for someone who is just starting to learn to use their eyes to communicate. Eye gaze is an access method for those who cannot directly select words or phrases on a communication system using their hands or fingers to point. Options are presented visually on the board and the individual uses their eyes to look at one of those options to select it.
Using an eye gaze activity board is limiting as there are only a few words available based on a particular activity, e.g. playdough. However, using activity boards is a great starting point for developing eye gaze as an access method, so the individual can use a more robust communication book or high tech device in the future.
How to create a portable eye gaze board
- Choose the vocabulary for each activity board (see ideas below). You don’t need to start with 6 or 8 options of words, you could just start with 3 words spaced out around the board, so that it is easier to see what the individual is looking at.
- Print out the words with a symbol or photo.
- Laminate the words. Use extra thick laminating pouches (250 microns) to create these boards, rather than using a bulky and heavy Perspex E-tran frame if you’d like to create something portable and lightweight.
- Cut out a rectangular hole in the middle so that you can look through it.
- Label the symbol on the reverse to help the communication partner.
How to use an eye gaze board
- 1.Establish a consistent ‘script’ for prompting eye gaze: Look around, look at me, look to choose
Sometimes it is difficult to know when someone is looking around to see what the options are, verses looking at a word to select it. Having a consistent script that everyone uses can help everyone to have clarity about looking to see what the options are verses looking to select.
“Look around” - expect that the individual will look at all the options on the board. This might only take a few seconds if they have been using this board for a while or it might take a while if it is new. It is important to give them lots of time.
“Look at me” – by looking at their communication partner, the individual is showing you that they have found the word that they want to communicate and are ready to tell you
“Look to choose” – the individual should look directly at the word they want to communicate and then you can acknowledge them through repeating the word “Oh you are telling me XYZ” and then doing what they have communicated.
Here is an example of an eye gaze board being used: https://www.youtube.com/watch?v=EqH6CdBleic
It is important for the whole team to present the options on the board in a consistent way, e.g. you might point to and name each the options in a clockwise manner starting at the top left corner each time.
Here is an example script: Laminate and attach this script to each of the eye gaze boards.
Adults...please all follow this script when presenting choices to Lucy so we all present them in the same way:
“Lucy it’s time to choose. You can use your eyes to tell me what you want”
“Let’s look at the options first together” (go through each option available with Lucy starting top right and going clockwise)
“Ready to choose...remember look at me to tell me you are ready to choose and then look at the one you want”
2. Give feedback
When you start teaching someone to use their eyes to communicate, it might be confusing for everyone. It is helpful for the communication partner to give lots of feedback about what you are noticing, e.g. “I see you quickly looked at ‘red’ so I think you want to wear your red top today” even if they only looked very briefly at the word/symbol red and then went on gazing out the window OR the individual might be looking quickly at all the options and never really gazing for long at any of them “You keep looking all around the board and I am not sure which word you want to choose today. Remember, look around to see all the options, look at me when you are ready, look to choose one word”. Giving feedback will teach the individual what you are noticing about their eye gaze and start to shape it into a more clear access method.
3. Be consistent!
Whatever script you decide to use or way of presenting the options, make sure that everyone on the team is consistent. It is confusing if some team members expect the individual to look at the communication partner before selecting the word and other team members to just expect a long gaze at a word to select it. This will help the individual to learn the system and to anticipate the word or phrase they want to select. Make sure you write clear instructions on the back of the boards if it is going to be used by multiple communication partners to ensure that everyone is using it in the same way.
4. Tips
Keep the board where you would normally use it, e.g. keep a farm animal board by your gumboots at the back door, so that it is ready to be used when you are going out for your walk or a colours board in the art box or a mealtime board on the fridge/pantry.
Remember to ensure that you are on the same level as the individual’s eyes when using the eye gaze board – this might mean squatting or sitting down so that you are not leaning or standing over the individual.
Also start working on using eye gaze to select ‘yes’ and ‘no’ to make choices. See this tip of the month for more info on teaching yes/no. http://talklink.org.nz/resources/tip-of-the-month-september-2017-teaching-yes-and-no-to-confirm-or-reject
Clear your brain of any possible messages before you start using the board so that you don’t accidentally prompt the individual to look at a certain word that you want. Just wait expectantly with your eyes on theirs until they are ready to make a selection.
How to model language on an eye gaze board
As with all AAC systems, the individual will need their system to be modelled to them throughout their day and with multiple communication partners. Remember, your communication partner will learn the system through continuous exposure to it. To model on an eye gaze board, you can either use your finger to point to a word or you can use your eyes like the individual would. Remember to give feedback and explain what you are looking at make a selection.
Examples of eye gaze boards
| If you live on a farm and go for a walk to visit all the animals each day, you could use this board to ask the individual what order to visit the animals in.
This is not so much about naming the animal that you see, but about making a real life choice about which animal to visit next. | Starting to introduce some core vocabulary words to be used in a range of activities, e.g. ‘go’ to make the music play, to make a toy car go down a ramp, to start a race, etc. |
| Make choices about which pet to have a cuddle with or which order to give them their food in or which order to give them a bath in. | Make choices and some comments during specific activities, such as bubbles, building with blocks, playing with trains, playing hide and seek, Mr Potato Head, etc. |
| Make choices about which song you’d like to sing. | Make choices about what to do during doll play. |
| You can choose what song you would like to sing. | Make choices about colours during an art activity. Or make choices about what clothes to wear, e.g. put a green and a red top out in the morning and ask which top they’d like to wear. |
| Make choices about what to do during break times. | Make choices about what to do during free time. |
Image references: https://aacbooks.net/books/AdaptingLowTech/
Created by Jessamy Bell (SLT) and Polly Thomas (Specialist Teacher) May 2020
To download this Tip of the Month as a PDF, please click here